When finding the perfect swimsuit top, it’s essential to consider factors like fit, comfort, and style. However, you don’t always have to settle for store-bought options. If you’re creative and want to add a personal touch to your swimwear collection, why not repurpose your bra into a swimsuit top?
It’s a unique, budget-friendly solution that allows you to showcase your individuality and transform an undergarment into a stylish swimwear piece.
In this article, we will guide you through turning your bra into a swimsuit top, providing step-by-step instructions and tips to help you create a one-of-a-kind garment that fits you perfectly. So, let’s start and explore the exciting world of DIY swimwear transformations.
Step-by-Step On How to Make Bra Into a Swimsuit Top
1. Gathering Materials
Before you begin the transformation process, gathering all the necessary materials is essential. Here’s a list of items you’ll need:
- Bra: Select a bra that you no longer use or don’t mind repurposing. Make sure it fits you well and provides adequate support.
- Scissors: You’ll need a pair of scissors to cut and trim the materials during the process.
- Needle and Thread or Sewing Machine: Choose either a needle and thread or a sewing machine for attaching and securing different components depending on your sewing skills and preference.
- Swimwear Fabric or Alternative: To enhance the appearance and functionality of your swimsuit top, choose a swimwear fabric that suits your style. If you don’t have swimwear fabric, look for a suitable alternative that is comfortable and appropriate for water activities.
- Elastic Bands: Elastic bands will be used to create straps and provide support. Choose strong and stretchy bands to hold the swimsuit top in place.
- Decorative Elements (Optional): If you want to add a touch of personal flair, consider embellishing your swimsuit top with decorative elements like beads, sequins, or fabric flowers.
2. Choosing the Right Bra
When repurposing your bra into a swimsuit top, it’s crucial to choose the right bra as a starting point. Here are some factors to consider:
- Proper Fit and Support: Select a bra that fits you well and provides adequate support. The swimsuit top should offer comfort and ensure that you feel secure while swimming or enjoying water activities.
- Style and Design: Consider the style and design elements of the bra. This will influence the overall look of your swimsuit top. Choose a bra that aligns with your personal taste and desired aesthetic.
- Comfortable Fabric: Opt for a bra made from fabric that is suitable for water activities. It should be quick-drying, durable, and resistant to fading or stretching. If possible, choose a bra with moisture-wicking properties to keep you comfortable while swimming.
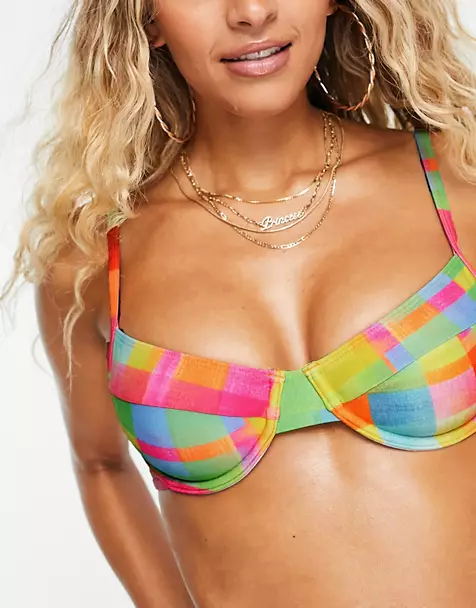
- Color and Pattern: Consider the bra’s color and pattern. You may want to choose a bra with a color or pattern that complements your personal style and matches well with other swimwear or beach attire.
3. Preparing the Bra
Before you begin the transformation process, preparing the bra to ensure a smooth and successful conversion is important. Follow these steps to get your bra ready:
- Remove Straps and Padding: Carefully detach any straps or padding from the bra. You want to work with just the basic structure of the bra cups. Use scissors to cut off any unwanted straps or padding, ensuring a clean and simplified base.
- Smooth Out Wrinkles: Lay the bra flat on a clean surface and gently smooth out any wrinkles or creases. This step will make it easier to work with the bra and ensure a neater end result.
4. Adding Straps
Adding straps to your DIY swimsuit top will provide the necessary support and ensure a comfortable fit. Here’s how you can attach straps to your transformed bra:
- Measure the Length: Determine the desired length of the straps for your swimsuit top. Keep in mind factors such as your shoulder width and personal preference. Use a measuring tape or simply estimate the length.
- Cut Elastic Bands: Cut two elastic bands according to your measured length. Ensure that the bands are strong and stretchy enough to hold the weight of the swimsuit top and provide a secure fit.
- Positioning: Position the bra cups on your chest and hold them in place. Imagine where the straps would naturally fall and mark those spots on the back and front of the bra. This will help guide you when attaching the elastic bands.
- Attach the Straps: Take one elastic band and secure one end to the marked spot on the back of the bra cup. You can use a needle and thread or a sewing machine to sew it securely in place. Repeat this process for the other strap, attaching it to the marked spot on the front of the bra cup.
- Test the Fit: Once the straps are attached, try on the swimsuit top and adjust the straps as needed. They should provide enough support without feeling too tight or loose. Make any necessary adjustments to ensure a comfortable and secure fit.
5. Enhancing Support and Coverage
To ensure optimal support and coverage for your DIY swimsuit top, add an additional layer of swimwear fabric. Here’s how you can achieve this:
- Select Suitable Swimwear Fabric: Choose a swimwear fabric that matches your style and preferences. Look for a stretchy, quick-drying material, and suitable for water activities. It should also provide the desired level of coverage.
- Cut the Fabric: Place your bra on the swimwear fabric and trace around the cups, leaving some extra fabric for seam allowance. Cut out the fabric pieces following the traced lines. You should have two fabric pieces, one for each bra cup.
- Attach the Fabric: Position one fabric piece over a bra cup, aligning it with the cup’s edges. Use pins to hold the fabric in place, ensuring it covers the cup entirely. Using a needle and thread or a sewing machine, sew the fabric onto the cup, following the existing seams or creating new ones. Repeat this process for the other cup.
- Secure the Fabric: Once both fabric pieces are attached, reinforce the seams to ensure they are sturdy and durable. This will help the fabric stay securely in place during wear and maintain the desired coverage.
6. Adding Embellishments
Consider adding embellishments to infuse your DIY swimsuit top with personal style and creativity. Here are some ideas to help you get started:
- Beads and Sequins: Add a touch of sparkle to your swimsuit top by sewing on beads or sequins. You can create intricate patterns, spell out words, or simply scatter them across the fabric for a subtle shimmer.
- Fabric Flowers: Attach fabric flowers to your swimsuit top for a feminine and playful look. Choose flowers in various sizes and colors, and sew them onto the fabric in a pattern or cluster them together for a focal point.
- Appliques: Use fabric appliques to add unique designs or motifs to your swimsuit top. These can be in the form of shapes, symbols, or even letters. Arrange the appliques on the fabric and secure them with stitches or fabric glue.
- Ribbon or Lace Trim: Enhance the edges of your swimsuit top with ribbon or lace trim. Sew the trim along the neckline, straps, or bottom hem to add a decorative touch and create visual interest.
- Embroidery: If you enjoy embroidery, consider adding embroidered designs to your swimsuit top. To personalize your creation, you can create intricate patterns, monograms, or even small images.
7. Customizing the Design
Now that you have the basic structure of your swimsuit top ready, it’s time to unleash your creativity and customize the design. Here are some ideas to help you create a unique and personalized swimsuit top:
- Cut-Outs and Patterns: Consider adding cut-outs or creating patterns on the fabric to give your swimsuit top an eye-catching look. You can create geometric shapes, floral motifs, or even playful designs. Use a fabric marker to trace the desired shapes and carefully cut them out using scissors.
- Tie-Dye or Dip-Dye: Create a vibrant and trendy look by tie-dyeing or dip-dyeing your swimsuit top. Use fabric dye in colors of your choice and follow the instructions on the dye package. You can experiment with techniques like spiral patterns, ombre effects, or color-blocking.
- Colorful Straps: If you’ve chosen elastic bands for the straps, consider using colorful bands to add a pop of color to your swimsuit top. Opt for bright and fun shades that complement the overall design.
- Layering and Overlays: Get creative with layering different fabrics or incorporating overlays to add depth and dimension to your swimsuit top. You can use sheer fabrics, lace, or mesh to create a unique and stylish look.
- Mix and Match: Don’t be afraid to mix and match different elements to create a truly personalized design. Combine fabrics, colors, and embellishments to express your style and create a swimsuit top that stands out.
How to Take Care of Your DIY Swimsuit Top
Once you’ve successfully transformed your bra into a stylish swimsuit top, it’s important to take proper care of it to ensure its longevity and maintain its quality. Here are some tips to help you keep your DIY creation in excellent condition:
1. Rinse After Each Use
After wearing your swimsuit top, rinse it with cool water to remove any chlorine, salt water, or sunscreen residue. This will help prevent discoloration and extend the life of the fabric.
2. Hand Wash or Gentle Machine Wash
To clean your swimsuit top, hand wash it using a mild detergent or opt for a gentle machine wash on a delicate cycle. Avoid using harsh chemicals or bleach, as they can damage the fabric and embellishments.
3. Air Dry
Avoid using a dryer to dry your swimsuit top after washing. Instead, lay it flat on a clean towel or hang it to air dry in a shaded area. Direct sunlight can cause fading and deterioration of the fabric.
4. Avoid Rough Surfaces
When wearing your DIY swimsuit top, be mindful of rough surfaces such as pool edges or rough sand. These surfaces can cause snags or tears in the fabric. Sit on a towel or use a beach mat to protect your swimsuit top.
5. Store Properly
Store your swimsuit top in a cool and dry place when not in use. Avoid folding or crushing it to maintain its shape. Store it in a breathable bag or container to protect it from dust and direct sunlight.
Final Words
Turning a bra into a swimsuit top is a creative and rewarding DIY project allowing you to showcase your style while saving money.
Embrace your creativity and let your DIY swimsuit top reflect your unique personality and style. Don’t be afraid to experiment with different designs, colors, and embellishments. Your swimsuit top will be a fashionable and functional piece and a testament to your ingenuity and resourcefulness.
So, grab your favorite bra, gather your materials, and embark on this fun and empowering journey of turning it into a fabulous swimsuit top. Unleash your imagination, express your style, and enjoy the satisfaction of wearing a truly unique swimwear piece you created yourself.

